
How to Publish Custom Codeunit as web service and Consume it in Navision Part 2


In this post we will consume the web service we published in my earlier post.


If we you haven't read my first post I would strongly recommend you to do so.

How to Publish Custom Codeunit as Web Service and consume it in Navision Part 1

In Network Credential you have to provide the username, password and domain name.

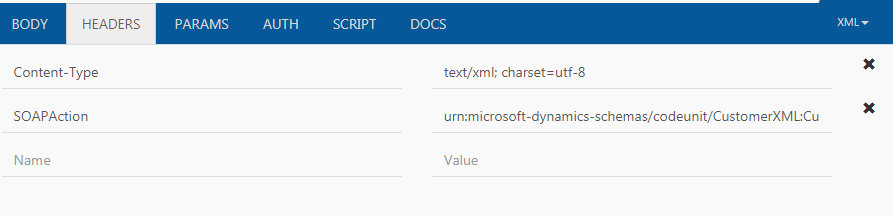
SOAPAction you can find in the boomerang which we used earlier.

Similarly you can the schema in the boomerang and load it in the XMLDoc.LoadXML() function.


The response we will get store it in outstream and with XMLNode.Innertext extract the result.


I have finally imported the result through the XML we created in my earlier post.


Hope the article was helpful to you.

Comments

Popular posts from this blog

How to Publish Custom Codeunit as web service and Consume it in Navision Part 1

In this post we will create a codeunit and publish this as a web service which will read a xml and send the XML in a variable big text format and consume the web service in another Codeunit of Navision I will divide this Blog into 2 parts. In the first part we will be publishing the Codeunit as web service. In the second part we will be consuming the web service. Pre-requisite-      1)   You will have to create staging table, I have created customer staging table.      2)   You will also have to create XMLport for the staging table we created so that we can export and import data into the table.      3)   You will need to install Chrome extension Boomerang (we will discuss its use later on). Let’s begin- I have created a staging table of customer with Primary Key as Entry No Similarly, I have created a XMLport of this staging table. Please change the Encoding property to UTF-8 and default namespace to No . As shown

How to Integrate Microsoft Dynamics CRM with Microsoft Dynamics Navision 2017?

   In my post, you will get to know how to integrate CRM with Navision 2017.     Prerequisite for CRM-     You would need an instance of CRM. If you dont have it you can click on the link and create one. https://www.microsoft.com/en-us/dynamics/free-crm-trial.aspx     Note- All my development and testing have done in Azure server.       Prerequisite for Nav - make sure all the CRM objects in Navision 2017 are the version of  NAVW110.00.00. 14199 , that is of cumulative update 2 , otherwise you get errors.     Follow the following Steps-   1. Go to CRM homepage, in the homepage go to Settings\Customizations and click on Solutions.       2.   Import a solution in CRM by clicking the import button and browse the zip file which is available in NAVDVD\CrmCustomization.        3. Click Next and Import the solution.       4. Now, under settings Go to Security and click on Users.       5. We need Two users in CRM to perform in

How to Integrate Microsoft Dynamics CRM with Microsoft Dynamics Navision 2017 with custom field mappings?

In my earlier Post of Nav-CRM integration, it was more focused on the functional side. Let’s go into the technical details of integration. If you haven’t read my first post of Nav-CRM integration, I would strongly recommend you to visit the link, To see how the connection is made. How to integrate Nav-CRM? Part 1 In this post we will discuss how to create custom field mappings in Customer-Account synchronization. Firstly there is a new table-type called CRM.   Now what should you do if you have a new custom field in CRM and you want to map with a custom field in CRM account table ID 5341? You cant create the field manually because it will give a ExternalType="" as Error.  For this you will have to use the power-shell cmdlet to Refresh the schema of table CRM account(5341). Open the Windows Power-shell ISE in Administrator mode . Import-Module "C:\Program Files (x86)\Microsoft Dynamics NAV\100\RoleTailored Client\Mi